Ready to hit the trails without the roar of a gas engine? Electric dirt bikes are revolutionizing off-road adventures, offering quiet power, instant torque, and an eco-friendly way to explore. But not all electric dirt bikes are created equal, especially when it comes to comfort. If you’re looking for the best electric dirt bike with a smooth ride, you’ve come to the right place. A smooth ride isn’t just about comfort; it’s about control, reducing rider fatigue, and allowing you to tackle more challenging terrain with confidence.
In this guide, we’ll dive into 10 top electric dirt bikes, evaluating their features, performance, and most importantly, how well they handle bumps and rough patches. We’re talking about advanced suspension systems, comfortable seating, and robust tires that make every ride feel like gliding. Let’s gear up and find your next silent shredder!
Our Top Picks for the Best Electric Dirt Bike with a Smooth Ride
Here’s a detailed look at the bikes that stand out for their exceptional ride quality and overall performance:
Tuttio Soleil01 Electric Dirt Bike for Teens Adults

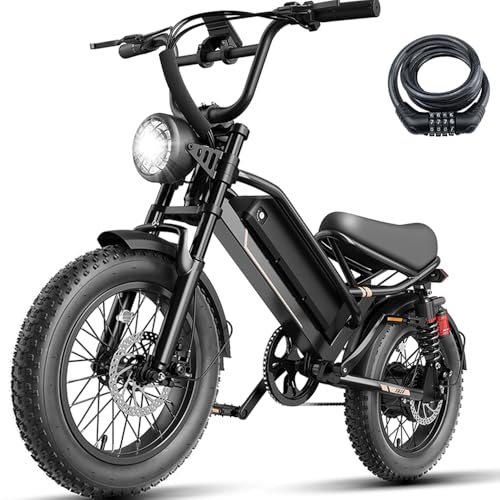
The Tuttio Soleil01 is a powerhouse designed for both teens and adults looking for serious off-road fun. What truly sets it apart is its combination of a potent 2000W brushless motor, a massive 48V 21AH lithium battery for extended adventures, and a meticulously engineered full-suspension system. The rear-mounted high-performance suspension paired with a state-of-the-art hydraulic fork system up front work in harmony to absorb shocks and bumps, ensuring a remarkably smooth ride even when conquering challenging terrains at speeds up to 37mph.
-
Key Features:
- 2000W Brushless Motor with up to 37mph top speed
- Long-lasting 48V 21AH lithium battery for 35-43 miles range
- Unique all-aluminum alloy forged frame
- Rear-mounted high-performance suspension and front hydraulic fork system
- 3 safe speed modes: 15 mph, 22 mph, 37 mph
- 14″(front)/12″(rear) puncture-resistant tires
- Hydraulic brakes for responsive stopping power
- Max load 265 lbs, suitable for ages 13+
-
Pros:
- Extremely powerful motor and high top speed
- Excellent battery range for longer rides
- Advanced full suspension system provides a very smooth ride
- Robust all-aluminum frame for durability
- Multiple speed modes for different skill levels
- Hydraulic brakes enhance safety
-
Cons:
- Relatively heavy at 105 lbs
- 6-7 hour charge time is moderate
- Requires checking local laws for age/license requirements
-
User Impressions: Riders consistently praise the Soleil01 for its exhilarating power and the comfortable, stable feeling it delivers across varied landscapes. Many note how the advanced suspension makes rough trails feel much more manageable.
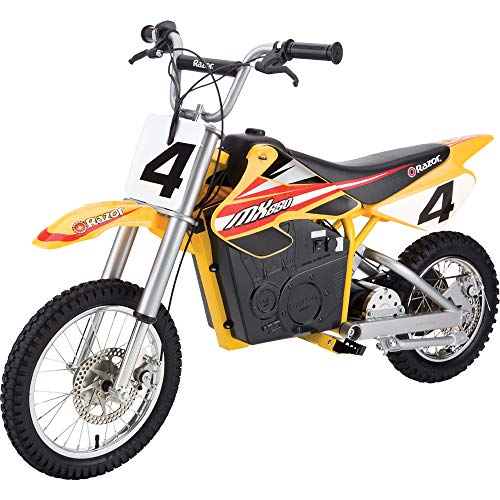
Razor MX350 Dirt Rocket Electric Motocross Bike

The Razor MX350 Dirt Rocket is a fantastic entry-level electric motocross bike, perfect for younger riders looking to get a feel for off-road excitement. While it’s not designed for extreme speeds, its simple yet effective design offers a reliable and enjoyable experience. The double-crown fork contributes to stability, and the soft rubber grips ensure a comfortable hold, allowing young adventurers to build confidence as they navigate their local dirt paths with a surprisingly agreeable ride for its size.
-
Key Features:
- Electric motocross bike design
- Double-crown fork for front-end stability
- Soft, rubber grips for comfortable handling
- Rear braking system
-
Pros:
- Iconic brand, trusted by parents
- Great for beginners and younger kids
- Simple and straightforward operation
- Soft grips enhance comfort
-
Cons:
- Very basic features compared to advanced models
- Limited speed and range (specs not fully detailed in provided info, implying entry-level)
- Only rear braking mentioned
-
User Impressions: Parents appreciate the MX350’s durability and ease of use for their children, often highlighting it as a great first dirt bike that delivers plenty of fun without being overwhelming.
ELEMARA Electric Dirt Bike, 15 mph & 150lb Max, 24V

The ELEMARA Electric Dirt Bike for kids combines cool styling with practical performance, making it an excellent choice for young thrill-seekers. This electric motorcycle features LED lights, a power display, and a twist-grip throttle for a realistic riding experience. Crucially, its 12″ large air-filled tires are designed to conquer various terrains, and the inclusion of rear seat shock springs ensures a comfortable and smooth ride, absorbing bumps to keep your child enjoying every moment.
-
Key Features:
- Cool and stylish exterior with LED lights and power display
- Key start and realistic twist-grip throttle
- 24V 250W powerful chain-driven motor (up to 15 mph, 10-mile range)
- 12″ large air-filled, wear-resistant rubber wheels
- Soft leather seat for comfort
- Innovative rear seat shock springs for shock absorption
- Hand-operated rear brake
- 150lb max weight capacity
-
Pros:
- Engaging design with cool features for kids
- All-terrain tires handle various surfaces well
- Comfortable seat and shock springs for a smooth ride
- Good speed and range for its class
- Focus on safety with shock springs and hand brake
-
Cons:
- Limited to kids (150lb max weight)
- 24V battery is relatively small for older children
-
User Impressions: Kids are thrilled by the realistic features and ability to ride off-road, while parents value the robust construction and the added comfort provided by the shock-absorbing design.
ECOLEAP K1 Kids Electric Dirt Bike 36V Motorcycle, 16MPH

The ECOLEAP K1 is engineered for safety and excitement, making it a stellar option for children aged 3-10. It boasts an inverted spring hydraulic front fork and a high-strength shock absorber, providing superior shock absorption that makes for a truly comfortable and smooth ride across diverse surfaces. With three adjustable speed modes and a powerful 36V 5.2AH lithium battery, kids can enjoy extended playtime at a pace that suits their skill level, all while staying safe and stable.
-
Key Features:
- Inverted spring hydraulic front fork + high-strength shock absorber
- Rear parking brake for quick stops
- IP54 waterproof body for durability
- Powerful motor with 3 speed modes (6 MPH, 9 MPH, 16 MPH)
- 36V 5.2AH lithium battery with up to 14 miles range
- 5-6 hour fast charging with BMS system
- 7-color ambient lighting design
- Designed for kids aged 3-10, max weight 176 LBS
- Lightweight (36 LBS) with 12-inch anti-skid tires
-
Pros:
- Exceptional safety features and robust suspension
- Customizable speed modes for different skill levels
- Long battery life with fast charging
- Lightweight and easy for children to operate
- Cool ambient lighting adds to the fun factor
-
Cons:
- Strictly for younger children (age 3-10)
- 14-mile range might be short for very active kids
-
User Impressions: Parents consistently praise the ECOLEAP K1 for its outstanding safety features and how well it handles various terrains, providing their children with an incredibly smooth and confidence-inspiring riding experience.
KOOZ HP115E 40MPH 60V 3000W Electric Dirt Bike for Teens

For teens ready to push the limits, the KOOZ HP115E is a lightning-fast electric dirt bike built for thrill-seekers. It packs a mighty 2000W continuous (3000W peak) brushless motor capable of reaching an exhilarating 40 mph. But power isn’t its only forte; the KOOZ HP115E features an advanced full suspension system with dual hydraulic front shocks and a high-performance single rear hydraulic shock. This setup expertly absorbs bumps, dips, and uneven surfaces, guaranteeing a supremely smooth ride and stable control across the most challenging trails.
-
Key Features:
- 2000W continuous / 3000W peak brushless power motor
- Max speed of 40 mph
- Durable and quick-release 60V 15.6AH lithium-ion battery
- Up to 18 miles range, 4-6 hour recharge time
- 14-inch front and 12-inch rear pneumatic tires with aggressive tread
- Comprehensive full suspension system: dual hydraulic front shocks, single rear hydraulic shock
- Variable speed dial (7.5mph to 40mph)
- IPX6 waterproof design
- Front and rear hydraulic disc brakes
- Designed for teens age 8-14 (Note: Product title also mentions “for Teens,…” and “adults” so there’s a slight discrepancy in age targeting, but features list 8-14)
-
Pros:
- Extremely powerful and fast for adrenaline junkies
- Advanced full suspension system delivers an exceptionally smooth and controlled ride
- Robust, aggressive tires for superior traction
- Quick-release battery for continuous exploration
- Variable speed settings cater to different skill levels
- Hydraulic disc brakes offer reliable stopping power
-
Cons:
- 18-mile range might feel limited for a high-speed bike
- Age range (8-14) in features limits its adult appeal despite the title.
-
User Impressions: Riders are consistently impressed by the sheer speed and power, often highlighting how the sophisticated suspension system makes tackling rugged terrain feel surprisingly comfortable and stable.
Electric Bike for Adults, Dirt Ebike 2000W/1500W Peak
This Yoloway Electric Dirt Ebike is designed for adults who want the versatility of an e-bike with the rugged capabilities of a dirt bike. Featuring a robust 1500W brushless motor (2000W peak), it delivers thrilling speeds up to 28 MPH, making it ideal for steep hills and off-road trails. What makes this a standout for a smooth ride are its 16″ x 4″ fat tires combined with a full suspension system. This setup ensures unstoppable grip and comfort, allowing you to excel on snow, sand, trails, and wet roads, absorbing bumps for a remarkably comfortable journey.
-
Key Features:
- 1500W brushless motor (2000W peak) with speeds up to 28 MPH
- Long-lasting 48V 12.5Ah removable lithium battery (up to 55 miles range)
- 30% faster charging (approx. 6 hours)
- All-terrain 16″ x 4″ fat tires
- Full suspension system
- Dual hydraulic disc brakes
- Ergonomic design, supports riders up to 331 lbs
- Full fenders for splash protection
- 90% pre-assembled with 12-month warranty
-
Pros:
- High power and impressive top speed
- Excellent battery range for extended adventures
- All-terrain fat tires and full suspension for superior comfort and stability
- Fast charging and removable battery option
- High weight capacity suits most adults
- Easy and quick assembly
-
Cons:
- 16″ wheels might be smaller than traditional dirt bikes, potentially affecting handling on very extreme terrain
- Hybrid “dirt ebike” might not be as specialized as a pure dirt bike
-
User Impressions: Adult riders rave about the bike’s comfort, attributing it to the fat tires and dual suspension. They enjoy its power for varied terrain and appreciate the smooth, stable feeling on both trails and urban commutes.
Razor MX650 Dirt Rocket Electric Motocross Off-road Bike
The Razor MX650 Dirt Rocket steps up from its MX350 sibling, offering a more powerful experience for serious young riders. With a 650-watt electric motor, it can reach speeds of up to 17 mph, providing a genuine motocross feel. The key to its comfortable ride lies in its dual suspension system and riser handlebars, which work together to absorb impacts and deliver a notably smooth ride. Paired with pneumatic knobby tires, this electric motocross bike ensures maximum power transfer and control across various off-road conditions.
-
Key Features:
- Powerful 650-watt electric motor (up to 17 mph)
- Authentic dirt bike frame geometry
- Dual suspension system for shock absorption
- Riser handlebars for comfortable ergonomics
- Pneumatic knobby tires (16 inches front, 14 inches rear)
- Quiet variable-speed, chain-driven motor
- Up to 40 minutes of battery life
- Electrical system certified compliant with UL2272
-
Pros:
- More powerful and faster than lower-end Razor models
- Dual suspension provides a genuinely smooth and comfortable ride
- Authentic motocross frame for a realistic feel
- Safety certified (UL2272)
- Pneumatic knobby tires offer good traction
-
Cons:
- Battery life of 40 minutes is relatively short
- Top speed of 17 mph might be outgrown by advanced riders
-
User Impressions: Kids and parents alike praise the MX650 for its robust build and exhilarating speed, often noting how much smoother and more enjoyable the ride is compared to other kids’ bikes, thanks to its effective suspension.
Yozma IN10 Electric Dirt Bike for Teens Adults, 2600W

Inspired by professional motocross bikes, the Yozma IN10 is an absolute beast designed for teens and adults who demand peak performance. It’s equipped with a formidable 2600W Peak mid-drive motor that effortlessly tackles slopes up to 30° and hits speeds of 40 MPH. But its true triumph for ride quality lies in its premium full suspension system: a responsive rear nitrogen suspension combined with 220mm travel front hydraulic suspension. This advanced setup provides unparalleled comfort, faster reaction, and ensures a consistently smooth ride, even after intense, long adventures over the roughest terrain.
-
Key Features:
- 2600W Peak mid-drive motor, crushes 30° slopes, 40 MPH top speed
- UL-certified 48V/23A removable battery with BMS system
- Exceptional max range of 63 miles
- Premium full suspension: Rear nitrogen suspension + 220mm travel front hydraulic suspension
- Reliable stop system: EABS with hydraulic disc brakes
- 14” front/12” rear fat tires for off-road stability
- Built for adventure and rugged trails
-
Pros:
- Extremely powerful motor for serious off-road capability
- Outstanding battery range for extended exploration
- Advanced full suspension provides a superior smooth and comfortable ride
- Excellent braking system for safety and control
- Robust fat tires offer unmatched stability on challenging terrains
-
Cons:
- High-performance features suggest a higher price point.
-
User Impressions: Riders consistently laud the IN10 for its immense power and the luxurious feeling of its advanced suspension, often describing the ride as incredibly smooth and controlled, making difficult trails feel remarkably easy.
ELEMARA Electric Dirt Bike, 350W Motorcycle for Kids with

This ELEMARA Electric Dirt Bike is another excellent choice for kids, boasting an upgraded 350W motor that delivers a max speed of 15.5 mph. What makes this electric motorcycle particularly engaging for young riders are its immersive features like realistic engine sounds, a twist-grip throttle, tail lights, music, and Bluetooth connectivity. Crucially for comfort, it combines 12″ large-size wear-resistant inflatable rubber wheels with a high-performance suspension system and a comfortable leather soft seat, ensuring a thrilling yet remarkably smooth ride on any terrain.
-
Key Features:
- 350W powerful motor (15.5 mph, 10 miles max range)
- 24V battery, suitable for kids up to 150 lb
- Imitates real car engine sounds, with twist-grip throttle
- Tail lights, music, and Bluetooth mode
- 12″ large-size wear-resistant inflatable rubber wheels
- Comfortable leather soft seat
- High-performance suspension system
- Rear Drum Brake for safety
-
Pros:
- Enhanced power and speed for kids compared to basic models
- Engaging realistic features (sound, music, Bluetooth)
- Excellent suspension and large wheels for a smooth and comfortable ride
- Comfortable soft seat
- Good safety features including rear drum brake
-
Cons:
- Still primarily for kids (150 lb max)
- 10-mile range is moderate for longer play sessions
-
User Impressions: Kids absolutely love the interactive features and the feeling of a “real” motorcycle, while parents are delighted by the bike’s sturdy construction and the effective suspension that provides a smooth, bump-free experience for their children.
RiderX Electric Dirt Bike for Adults Teens, 3000W Brushless

The RiderX Electric Dirt Bike is a top-tier performer, specifically engineered for adults and teens seeking ultimate power, precision, and an exceptionally smooth ride. It features a “Ultimate E-Dirt Bike Performance Controller” (120A continuous/300A peak) and a professional 3000W brushless QS Motor delivering a colossal 220Nm of torque, allowing it to conquer 45° climbs and hit speeds up to 38MPH. Its FOC 3.0 Silent Drive System ensures quiet, buttery-smooth acceleration, while the dual hydraulic brakes and comprehensive full suspension system provide unparalleled control and shock absorption, making every ride effortlessly smooth and stable on demanding trails.
-
Key Features:
- 120A Continuous/300A Peak Performance Controller with FOC 3.0 Silent Drive System
- Professional 3000W brushless QS Motor with 220Nm torque
- Conquers 45° climbs and reaches 38MPH
- Military-Grade IP67 Protection (operates from -30°C to 85°C, heavy rains)
- All-terrain fat tires with progressive knob spacing
- Advanced Safety System: Dual hydraulic brakes + full suspension
- Reinforced carbon steel frame (supports 289lbs)
- 3 speed modes (including 9.5MPH low for beginners)
- Smart Display for real-time info
- Long-lasting 48V battery with BMS, 48-mile range, fast charger (4-5 hours)
- 90% pre-assembled, 1-year motor/battery, 2-year frame warranty
- Designed for ages 13+
-
Pros:
- Extreme power and torque for superior climbing and speed
- Advanced silent drive system for quiet operation and smooth acceleration
- IP67 waterproof rating for all-weather riding
- Comprehensive full suspension and fat tires ensure an exceptionally smooth and controlled ride
- Robust safety features including dual hydraulic brakes
- Excellent battery range and fast charging
- Long warranty for peace of mind
-
Cons:
- High performance might be an overkill for casual riders
- Premium features suggest a higher investment
-
User Impressions: Riders consistently express awe at the RiderX’s silent yet explosive power, describing the ride as incredibly smooth and highly controlled, making it a joy to tackle even the most challenging off-road conditions.
What Makes an Electric Dirt Bike Ride Smooth?
When you’re searching for the best electric dirt bike with a smooth ride, there are a few key elements to keep in mind that significantly impact your comfort and control:
- Suspension System: This is arguably the most critical factor. High-quality front forks (hydraulic or air-based) and rear shock absorbers (coil, air, or nitrogen-filled) soak up bumps, dips, and impacts from rough terrain. A full suspension setup (both front and rear) will always provide a smoother ride than a hardtail (front suspension only).
- Tires: The type, size, and inflation of your tires play a huge role. Larger diameter tires (like 14″ or 16″) can roll over obstacles more easily. Knobby, pneumatic (air-filled) tires provide cushioning and grip, making uneven surfaces feel less jarring. Fat tires offer even more cushioning and stability.
- Frame Geometry and Materials: A well-designed frame can contribute to stability and natural shock absorption. Materials like aluminum alloy or reinforced steel offer a good balance of strength and flexibility.
- Ergonomics and Seating: A comfortable, padded seat and properly positioned handlebars (like riser handlebars) reduce rider fatigue and allow you to absorb some impacts with your body, enhancing the overall feeling of a smooth ride.
- Motor Power Delivery: While not directly about shock absorption, a motor with smooth, consistent power delivery (like a brushless motor with an advanced controller) prevents jerky acceleration, which can contribute to a more controlled and comfortable experience.
Frequently Asked Questions (FAQ)
Q1: What makes an electric dirt bike have a smooth ride?
A: A smooth ride primarily comes from a high-quality full suspension system (front forks and rear shock absorber), large pneumatic tires designed for off-road use, and ergonomic design elements like a comfortable seat and handlebar placement that help absorb impacts and reduce rider fatigue.
Q2: Are electric dirt bikes good for off-road trails?
A: Absolutely! Many electric dirt bikes are specifically designed for off-road use, featuring robust frames, powerful motors, knobby tires, and advanced suspension systems to handle challenging trails, dirt paths, and even muddy or sandy conditions. Always check the specific model’s capabilities and intended use.
Q3: How fast can electric dirt bikes go?
A: The speed of electric dirt bikes varies greatly depending on the model. Kids’ electric dirt bikes might go up to 15-20 mph, while high-performance adult models can reach speeds of 30-40 mph, and even higher for some specialized racing e-dirt bikes.
Q4: What’s the battery life like on these bikes?
A: Battery life, often measured in range (miles) or ride time, depends on the battery’s voltage (V) and ampere-hours (Ah), motor power, rider weight, terrain, speed, and temperature. Ranges can vary from 30-40 minutes of ride time for kids’ bikes to 40-60+ miles for advanced adult models. Charging times typically range from 4 to 8 hours.
Q5: Are electric dirt bikes quieter than gas models?
A: Yes, significantly so! Electric dirt bikes are known for their quiet operation, especially compared to their noisy gas-powered counterparts. This makes them ideal for riding in areas where noise pollution is a concern and allows riders to enjoy the sounds of nature.
Q6: What safety gear do I need for an electric dirt bike?
A: Safety is paramount. Always wear a DOT-approved helmet, eye protection (goggles), gloves, durable long-sleeved shirts and pants, and protective padding for knees, elbows, and chest. Appropriate dirt bike boots are also highly recommended.
Q7: How do I choose the right size electric dirt bike?
A: Choosing the right size is crucial for safety and comfort. Consider the rider’s age, height, and weight. The rider should be able to comfortably touch the ground with their feet (or at least toes) while seated and reach the handlebars easily. Manufacturers usually provide age and weight recommendations for each model.
Ready to Ride?
Finding the best electric dirt bike with a smooth ride means prioritizing quality suspension, robust tires, and ergonomic design. Whether you’re a parent looking for a safe and fun ride for your child or an adult seeking an exhilarating off-road experience without the noise and fumes, there’s an electric dirt bike out there for you. Our top picks offer a fantastic blend of power, range, and ride comfort to ensure your next adventure is nothing short of amazing. Happy trails!